
Adapter Guide
Car Lift Adapters for Better Reach and Clearance
Compare car lift adapters for height, reach, and clearance, including adjustable, fixed, flip-up, low-rise, and drop-in designs.
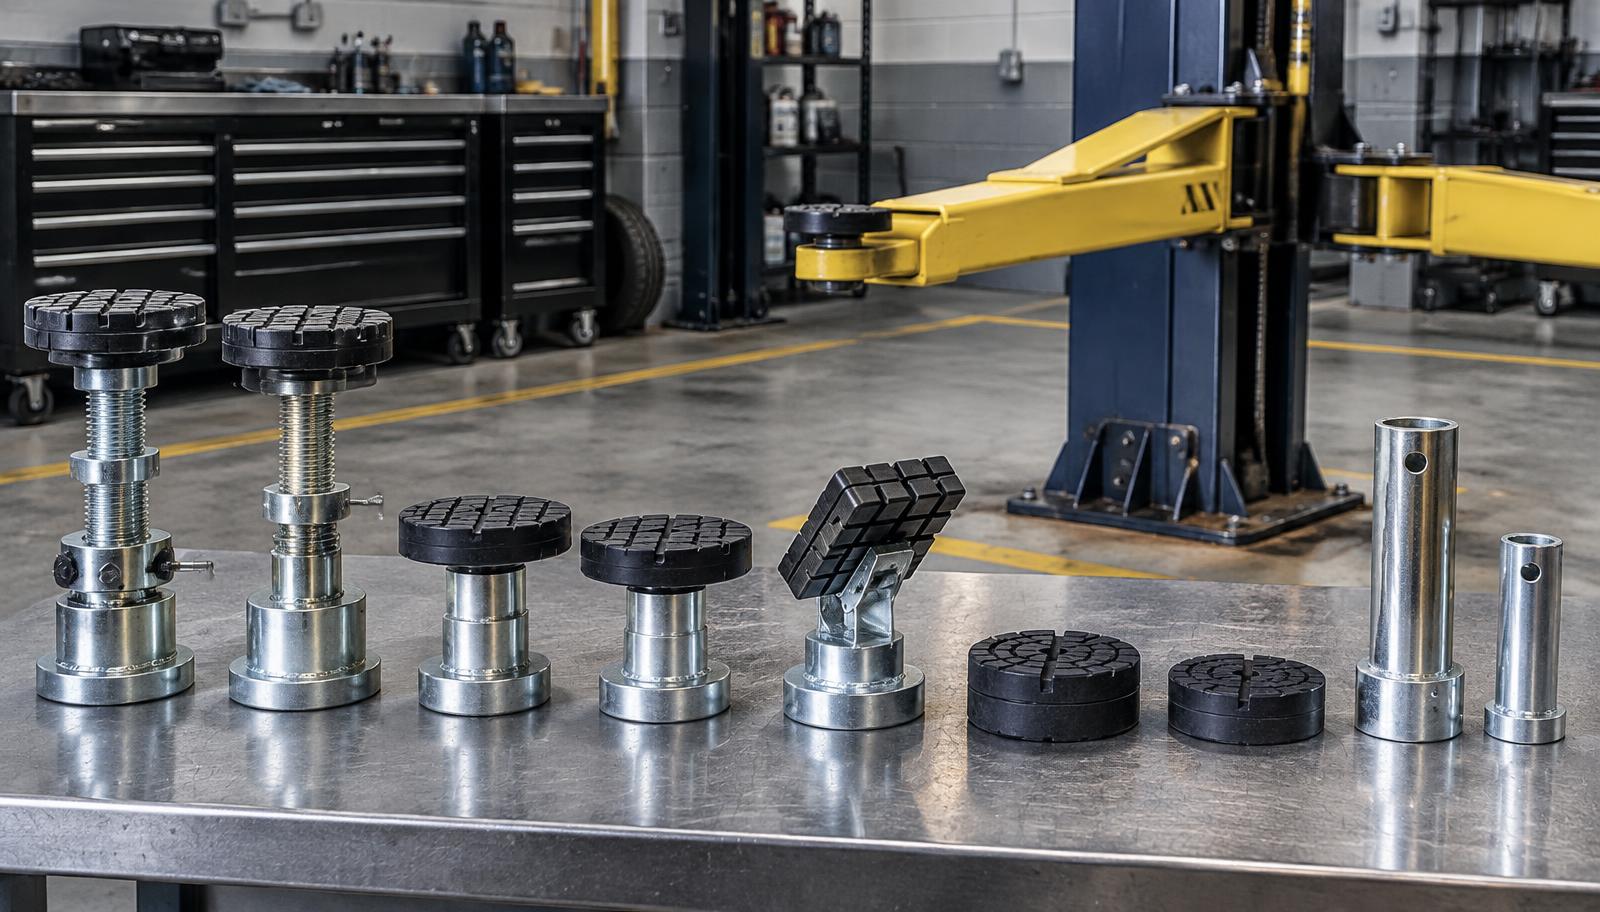
Car lift adapters help an approved lift contact reach an approved vehicle lifting point when the standard arm setup lacks the required height or clearance. The correct adapter must match the lift make, model, pad interface, top style, and required working range. Adjustable-height, fixed-height, flip-up, low-rise, and drop-in extension designs solve different equipment problems. Measure first, consult both manufacturers' instructions, and never use an adapter as permission to contact an unapproved area of the vehicle.
Key takeaways: Identify the lift and vehicle lifting points before choosing a format. Adjustable adapters cover a range; fixed adapters provide one documented height. Confirm the base, top, and height code. Do not stack, modify, or mix unapproved parts. Call 888-588-9555 when the catalog and your measurements do not establish fit.
What do car lift adapters do?
An adapter changes the geometry between a lift arm and the vehicle. Depending on its design, it can add vertical height, provide a different approved contact top, or extend an existing system. This can help a technician clear rocker panels or reach frame locations while keeping the arm and contact arranged as the equipment manufacturer intended.
An adapter does not create a new vehicle lift point, increase lift capacity, or correct damaged arms. The vehicle manufacturer identifies acceptable lifting locations, while the lift manufacturer specifies approved arm contacts, adapters, capacities, and setup procedures. Both sources have to agree with the planned use.
Start with the automotive lift adapters catalog only after recording the lift make, full model, serial number, arm or pad style, and vehicle need. Those facts make the categories useful instead of overwhelming.
When should you consider adjustable-height adapters?
Adjustable-height adapters provide a working range rather than one fixed rise. That flexibility can suit a service bay handling vehicles with different frame and rocker clearances, provided the selected part is approved for the lift and used within its listed range.
Pads4Lifts' adjustable-height adapter category explains its model code. The first four characters identify the lift brand and pad style, the letters after the dash identify the top style, and the final characters describe the height range. For example, the category states that “46” represents a 4-to-6-inch range. Use the category's current explanation and each product listing when decoding a candidate.
Adjustment adds inspection points. Threads, locking features, pins, and contact surfaces must remain clean, undamaged, and fully engaged as directed. Set all positions consistently where the manual requires it, and never extend beyond the documented range.
When is a fixed-height adapter more suitable?
A fixed-height adapter supplies one defined rise with no working adjustment range. It may suit a repeated application where the same approved vehicle contact and lift configuration are used regularly. Its simpler form does not remove the need to match the base, top, and exact height.
The fixed-height adapter category uses a related model-code structure: the first four characters identify brand and pad style, followed by a top-style letter and a height character. Read the live category explanation and product description carefully rather than inferring a code from another family.
A fixed adapter that is slightly too high or too low is not close enough. Re-measure the required working position and verify that arm sweep, vehicle clearance, and approved contact can all be achieved without improvised shims or stacks.
How do flip-up and low-rise designs differ?
A flip-up design keeps an alternate contact or extension attached to the arm so it can be moved into its intended operating position when needed. A low-rise design addresses applications that need less added height. These descriptions refer to different mechanisms and uses; they do not make the products interchangeable.
Inspect hinge, lock, stop, retention, and contact features on a flip-up assembly according to the lift manual. The mechanism must be in the specified position before loading. For a low-rise option, verify that the smaller increase still reaches the approved vehicle point while maintaining required clearance around body and underbody components.
Do not choose a format because it is familiar from another lift. Match the current arm and pad system. Even lifts from the same brand may use different base styles, and a previous owner may have changed the hardware.
What are drop-in extensions used for?
A drop-in extension works with a documented receiving system, typically by inserting into a compatible arm, socket, or adapter. Its fit depends on more than extension height. Diameter, engagement depth, retention, shoulder geometry, and top interface may all matter.
Pads4Lifts lists drop-in extensions as stocked items that generally ship within one business day. That availability should not rush the fitment decision. Compare the exact product details with the lift manual and the receiving hardware before ordering.
Never stack extensions unless the lift manufacturer explicitly documents that combination. Never place a loose block between components to gain extra height. Added interfaces can alter stability and engagement, so use only the approved arrangement.
Which measurements do you need before ordering?
Measure the equipment first, then the working need. Keep the lift unloaded while inspecting and follow the manufacturer's procedure for positioning or removing components.
- Record the lift manufacturer, complete model, serial number, capacity, and arm style.
- Identify the current pad or adapter base, including pin, thread, socket, bolt pattern, or flip-up mount.
- Measure the base with a caliper where close diameters matter, plus engagement length and shoulders.
- Identify the approved vehicle lifting point from the vehicle information.
- Document the vertical working gap and surrounding clearance without placing any person beneath an unsupported vehicle.
- Record the required top shape and any manufacturer-approved contact accessory.
- Compare minimum and maximum working heights, not only a nominal adapter label.
Photograph the lift data plate, arm end, existing pad from several angles, and the relevant vehicle contact area. Label measurements with units. A sketch showing where each dimension begins and ends often prevents confusion.
How do Pads4Lifts adapter codes help?
The adjustable and fixed category pages explain how their model numbers encode useful selection information. In the adjustable JO01xx-xx pattern, the first four characters relate to lift brand and pad style, then codes such as AB, AC, or AE identify top style, followed by the height range. The fixed JO31xx-xx family follows a similar idea with B, C, or E top-style codes and a fixed height.
Treat the code as a catalog navigation aid, not a universal engineering standard. Decode it using the current page, then confirm the individual product's description and your equipment. Do not transfer a meaning to a different series unless the site explicitly defines it.
Both adjustable and fixed category pages state that these products are built to order and ship by UPS Ground only. Account for that lead-time and shipping restriction before taking a lift out of service. Do not keep using unsafe equipment while waiting for a part.
How should shops compare adapter formats?
Begin with the permitted lift interface. Eliminate every format that does not match it. Next, compare the required height or range. An adjustable design can cover several documented positions; a fixed design offers one repeatable height; a flip-up design changes between its engineered positions; a low-rise format adds a smaller amount; and a drop-in extension works only with its receiving system.
Then consider workflow. A mixed-vehicle repair bay may value a documented adjustment range. A fleet bay may value a consistent fixed setup. Those operational preferences come after compatibility, capacity, and approved use.
Finally, compare inspection and storage needs. Removable pieces should be labeled and stored as sets. Moving mechanisms require checks. Built-to-order products deserve an especially careful review because an incorrect code can delay the repair.
What mistakes create unsafe or expensive results?
Guessing height from a photograph is a frequent error. So is choosing only by lift brand while ignoring model and arm style. Other mistakes include measuring a worn part without checking the receiving hardware, overlooking model-code letters, and assuming a taller extension is more versatile.
Mixing heights or brands, stacking adapters, drilling or grinding parts, bypassing a lock, and using an attachment beyond its listed range are not acceptable shortcuts. An adapter must sit squarely and engage exactly as its instructions require.
Inspect every contact before use. Remove cracked, bent, loose, incomplete, contaminated, or poorly engaged components from service. Follow the lift manufacturer's manual, the vehicle manufacturer's lifting-point instructions, and applicable safety requirements for positioning, capacity, testing, inspection, and maintenance.
How do you confirm the final choice?
Create a comparison table with lift identification, base interface, top style, minimum and maximum height, required clearance, stated fitment, quantity, and product code. Mark each as matched, unmatched, or unknown. A single mismatch stops the selection.
If you need help, send Pads4Lifts the lift data plate, arm and current contact photos, measurements, vehicle need, and the product codes being considered. Call 888-588-9555, Monday through Friday, 8:00 a.m. to 6:00 p.m. EST. Support can work from precise details; it cannot safely confirm a fit from “it looks about right.”
Choose the adapter that matches the whole system
Car lift adapters improve reach and clearance only when the lift, adapter, and vehicle contact are treated as one system. Identify the equipment, measure the interface and working need, decode the product family carefully, and verify the individual listing against both manufacturers' guidance. That process separates a documented solution from an improvised one and gives the shop a record it can inspect and repeat.
Frequently Asked Questions
What do car lift adapters do?
They change the approved contact height, reach, or format between a compatible lift arm and a vehicle's manufacturer-designated lifting point.
How do I know which adapter height I need?
Identify the approved vehicle lifting point, document the working gap and clearance, then compare those measurements with the lift manual and the adapter's listed range.
Can I use the same car lift adapter for every vehicle?
Not necessarily. Vehicle lift points, clearances, lift arm designs, and approved accessories vary. Verify the complete setup for each application.
Are adjustable and fixed-height adapters interchangeable?
No. They provide different height behavior and use product-family-specific bases and tops. Match the exact lift interface, code, and documented working height.
Still need help finding the right lift part?
Tell us your lift model and measurements. We will help you confirm the fit before you order.